To fix it we should use a more advanced texture mapping technique. Let's try triplanar mapping.
Take a look at the picture below to see what we are talking about. Texture gets stretched on steep slopes (see marked areas).
 |
| Texture distortion on steep slopes (click for larger image) |
This artifact happens because our terrain is grid based thus the more height difference there is between two neighbor vertices the more distant they will be. Quite straightforward. This isn't a problem alone but we do simple planar mapping i.e. texture gets mapped based on the x and z world axes (y is up). Thus if we have a slope the same size of texture will be mapped on a larger shape hence the distortion/stretching.
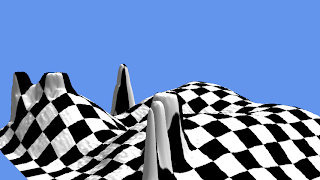
To make the problem more visible take a look at the terrain with chess texture.
 |
| Result of planar mapping |
We can fix this by sampling based on all three planes (xz, yz, xy). This is called triplanar mapping.
To be more exact: we take three samples from the same texture but all three based on different planes. We blend these three sampled colors based on the current normal. The normal tells which direction we are facing. If the current pixel is facing up ("flat land") we should map UV based on xz but if it is facing right ("slope") then we should map based on yz. For all pixels in between we should interpolate colors of taken samples.
(Note: we should sample the texture three times and interpolate between three colors based on normal and not interpolate between texture uvs based on normal and take one sample. The latter causes ugly discontinuities. I tried it. :)
To achieve the above mentioned we have to leave our BasicEffect instance and create our own shader for the terrain.
In our pixel shader we simply determine (based on normal) weights for interpolation:
mXY = abs(input.worldNormal.z);

mXZ = abs(input.worldNormal.y);

mYZ = abs(input.worldNormal.x);
Then we make their sum equal to one (this is important because we don't want to add or remove any color from the original texture):
float total = mXY + mXZ + mYZ;

mXY /= total;

mXZ /= total;

mYZ /= total;
Then we take our three samples from same texture:
float4 cXY = tex2D(TextureSampler, input.worldPosition.xy * scale);

float4 cXZ = tex2D(TextureSampler, input.worldPosition.xz * scale);

float4 cYZ = tex2D(TextureSampler, input.worldPosition.yz * scale);
And blend them together based on normal vector:
output.Color = cXY*mXY + cXZ*mXZ + cYZ*mYZ;
See picture below to check out the result. You are right, it is not that impressive. Although stretches/distortions have disappeared there is a quite relevant amount of blurring. This is because at every pixel three color samples are interpolated. Compare picture at the bottom with the one in the middle. We have lost (if not more) what we won with anisotropic filtering.
 |
| top and middle: triplanar mapping with interpolation bottom: planar mapping (click for larger image) |
Interpolation did happen on areas as well where we didn't need it. For instance, on the hills (on the right) we could have just simply used xz mapping (and not blend colors) because distortion is so minor it's acceptable.
Ok. Let's rephrase what we really want: for pixels facing almost up should be only xz-mapped and pixels facing almost right should be only yz-mapped. For a small interval for pixels in between we should interpolate. We achieve this by changing weights in pixel shader following way:
float tighten = 0.4679f; mXY = abs(input.worldNormal.z) - tighten;
mXZ = abs(input.worldNormal.y) - tighten;
mYZ = abs(input.worldNormal.x) - tighten;
That is, we tighten up the blending zone. See picture below for the result. This looks way better. Actually, it looks great! Although there is a minimal blurring around mapping plane changes the stretch free, consistent texture appearance compensates it.
 |
| Triplanar mapping with tightened blending zone (click for larger image) |
This is it. Terrain without texture distortions achieved with triplanar texture mapping.
One more thing: to see how samples were weighted based on normal I changed the color of the texture respectively of which plane were used for mapping. See the terrain below with these color maps to have a better understanding of our mapping.
 |
| Planar, Triplanar mappings compared with help of colormaps (click for larger image) |
Hmm I normalized the normal weights to 1 by just squaring the normal components.
ReplyDeleteHow do you convert the final color into uv coordinates without using the GPU to automatically do that. This returns a color, but how do you get uvs?
ReplyDeleteHey, without using the GPU? What do you mean?
DeleteConverting color into uv? What for?
The code snippets above are from the pixel shader. They return a color value - for every pixel. And we derive their UV values from their world position. Then we use that derived UV value to sample from textures and finally get some color.
Thank you for this! I'm using Marching Cubes for a terrain engine with XNA and you provided a great example and explanation about how to do the texture mapping.
ReplyDelete